In today's digital era, the ability to upload and download images is an important feature for many web applications.
Whether you're building an e-commerce platform, a social media network, or a content management system, providing users with the capability to handle images seamlessly is essential.
In which, I showed you how to write testing code for uploading and downloading image into SQL database with Spring Boot. So, this part 1 was more focused on production code.
By the end of this article, you will have an understanding of how to implement an image upload and download feature using Spring Boot.
So let diving in!
Prerequisite
While the blog post may provide some effective explanations, having all the points listed below in check beforehand of this will enhance the reading experience and enable readers to grasp the concepts and ideas more effectively.
- You should have all the dependencies listed below
- You should have a working database installed and running
- Have Postman (or an alternative) installed
Dependencies
To achieve all the steps required to make this tutorial work for you, you should have all these dependencies in your pom.xml file.
<dependencies>
    <dependency>
        <groupId>org.postgresql</groupId>
        <artifactId>postgresql</artifactId>
        <version>42.5.1</version>
    </dependency>
    <dependency>
        <groupId>org.springframework.boot</groupId>
        <artifactId>spring-boot-starter-data-jpa</artifactId>
    </dependency>
    <dependency>
        <groupId>org.springframework.boot</groupId>
        <artifactId>spring-boot-starter-web</artifactId>
    </dependency>
    <dependency>
        <groupId>org.projectlombok</groupId>
        <artifactId>lombok</artifactId>
        <optional>true</optional>
    </dependency>
    <dependency>
        <groupId>org.springframework.boot</groupId>
        <artifactId>spring-boot-starter-test</artifactId>
        <scope>test</scope>
    </dependency>
    <dependency>
        <groupId>org.apache.commons</groupId>
        <artifactId>commons-lang3</artifactId>
        <version>3.12.0</version>
    </dependency>
</dependencies>
Entity
We have to create our entity class that we will use to create an image in the database.
import lombok.AllArgsConstructor;
import lombok.Builder;
import lombok.Data;
import lombok.NoArgsConstructor;
import org.hibernate.annotations.Type;

import javax.persistence.*;

@Data
@Entity
@Builder
@NoArgsConstructor
@AllArgsConstructor
@Table(name = "Images")
public class Image {

    @Id
    @GeneratedValue(strategy = GenerationType.SEQUENCE)
    private Long id;
    private String name;
    private String type;

    @Lob
    @Type(type = "org.hibernate.type.ImageType")
    private byte[] imageData;
}
Repository
Now we have to declare our repository, we will use to perform requests to our database.
import com.example.entity.Image;
import org.springframework.data.jpa.repository.JpaRepository;
import org.springframework.stereotype.Repository;

import java.util.Optional;

@Repository
public interface ImageRepository extends JpaRepository<Image, Long> {
    Optional<Image> findByName(String name);
}
Service
We write our service that will perform the upload and download of the image.
import com.example.entity.Image;
import com.example.repository.ImageRepository;
import com.example.util.ImageUtils;
import lombok.RequiredArgsConstructor;
import org.apache.commons.lang3.exception.ContextedRuntimeException;
import org.springframework.stereotype.Service;
import org.springframework.web.multipart.MultipartFile;

import java.io.IOException;
import java.util.Optional;
import java.util.zip.DataFormatException;

@Service
@RequiredArgsConstructor
public class ImageService {

    private final ImageRepository imageRepository;

    public String uploadImage(MultipartFile imageFile) throws IOException {
        var imageToSave = Image.builder()
                .name(imageFile.getOriginalFilename())
                .type(imageFile.getContentType())
                .imageData(ImageUtils.compressImage(imageFile.getBytes()))
                .build();

        imageRepository.save(imageToSave);
        return "file uploaded successfully : " + imageFile.getOriginalFilename();
    }

    public byte[] downloadImage(String imageName) {
        Optional<Image> dbImage = imageRepository.findByName(imageName);
        return dbImage.map(image -> {
            try {
                return ImageUtils.decompressImage(image.getImageData());
            } catch (DataFormatException | IOException exception) {
                throw new ContextedRuntimeException("Error downloading an image", exception)
                        .addContextValue("Image ID",  image.getId())
                        .addContextValue("Image name", imageName);
            }
        }).orElse(null);
    }
}
As you see in these 2 methods, we use an ImageUtils class to perform transformation on the image before saving it into database. Here's what this class looks like.
import java.io.ByteArrayOutputStream;
import java.io.IOException;
import java.util.zip.DataFormatException;
import java.util.zip.Deflater;
import java.util.zip.Inflater;

public class ImageUtils {

    public static final int BITE_SIZE = 4 * 1024;

    public static byte[] compressImage(byte[] data) throws IOException {
        Deflater deflater = new Deflater();
        deflater.setLevel(Deflater.BEST_COMPRESSION);
        deflater.setInput(data);
        deflater.finish();

        ByteArrayOutputStream outputStream = new ByteArrayOutputStream(data.length);
        byte[] tmp = new byte[BITE_SIZE];

        while(!deflater.finished()) {
            int size = deflater.deflate(tmp);
            outputStream.write(tmp,0, size);
        }

        outputStream.close();
        return outputStream.toByteArray();
    }

    public static byte[] decompressImage(byte[] data) throws DataFormatException, IOException {
        Inflater inflater = new Inflater();
        inflater.setInput(data);
        ByteArrayOutputStream outputStream = new ByteArrayOutputStream(data.length);
        byte[] tmp = new byte[BITE_SIZE];

        while (!inflater.finished()) {
            int count = inflater.inflate(tmp);
            outputStream.write(tmp, 0, count);
        }

        outputStream.close();
        return outputStream.toByteArray();
    }
}
Controller
To be able to make our Rest API work, we should set up HTTP Request, this is what our controller will look like.
import com.example.service.ImageService;
import lombok.RequiredArgsConstructor;
import org.springframework.http.HttpStatus;
import org.springframework.http.MediaType;
import org.springframework.http.ResponseEntity;
import org.springframework.web.bind.annotation.*;
import org.springframework.web.multipart.MultipartFile;

import java.io.IOException;

import static org.springframework.http.MediaType.IMAGE_PNG_VALUE;

@RestController
@RequestMapping("/image")
@RequiredArgsConstructor
public class ImageController {

    private final ImageService imageService;

    @PostMapping
    public ResponseEntity<?> uploadImage(@RequestParam("image") MultipartFile file) throws IOException {
        String uploadImage = imageService.uploadImage(file);
        return ResponseEntity.status(HttpStatus.OK).body(uploadImage);
    }

    @GetMapping("/{fileName}")
    public ResponseEntity<?> downloadImage(@PathVariable String fileName) {
        byte[] imageData = imageService.downloadImage(fileName);
        return ResponseEntity.status(HttpStatus.OK)
                .contentType(MediaType.valueOf(IMAGE_PNG_VALUE))
                .body(imageData);
    }
}
Before diving into the demo section, we should define our application properties in an application.yaml file.
spring:
  datasource:
    driver-class-name: org.postgresql.Driver
    url: jdbc:postgresql://localhost:5432/tutorials
    username: 1kevinson
    password: admingres
  jpa:
    hibernate:
      ddl-auto: update
    show-sql: true
    properties:
      hibernate:
        dialect: org.hibernate.dialect.PostgreSQLDialect

logging:
  level:
    org.springframework: info
    org.hibernate: info

server:
  port: 8000
In case you missed it, I have written another blog post about creating a ready-to-use Postgres Database with Docker.
Resources
To be able to perform the demo of this tutorial, I choose to add one image in the static folder inside resources folder.
resources/
	static/
		images/
			desert-sand.jpg
	templates/
	application.yml
Demonstration
To perform your request, you will need to start your application on your machine, to do so, run this command.
$ mvn spring-boot:start
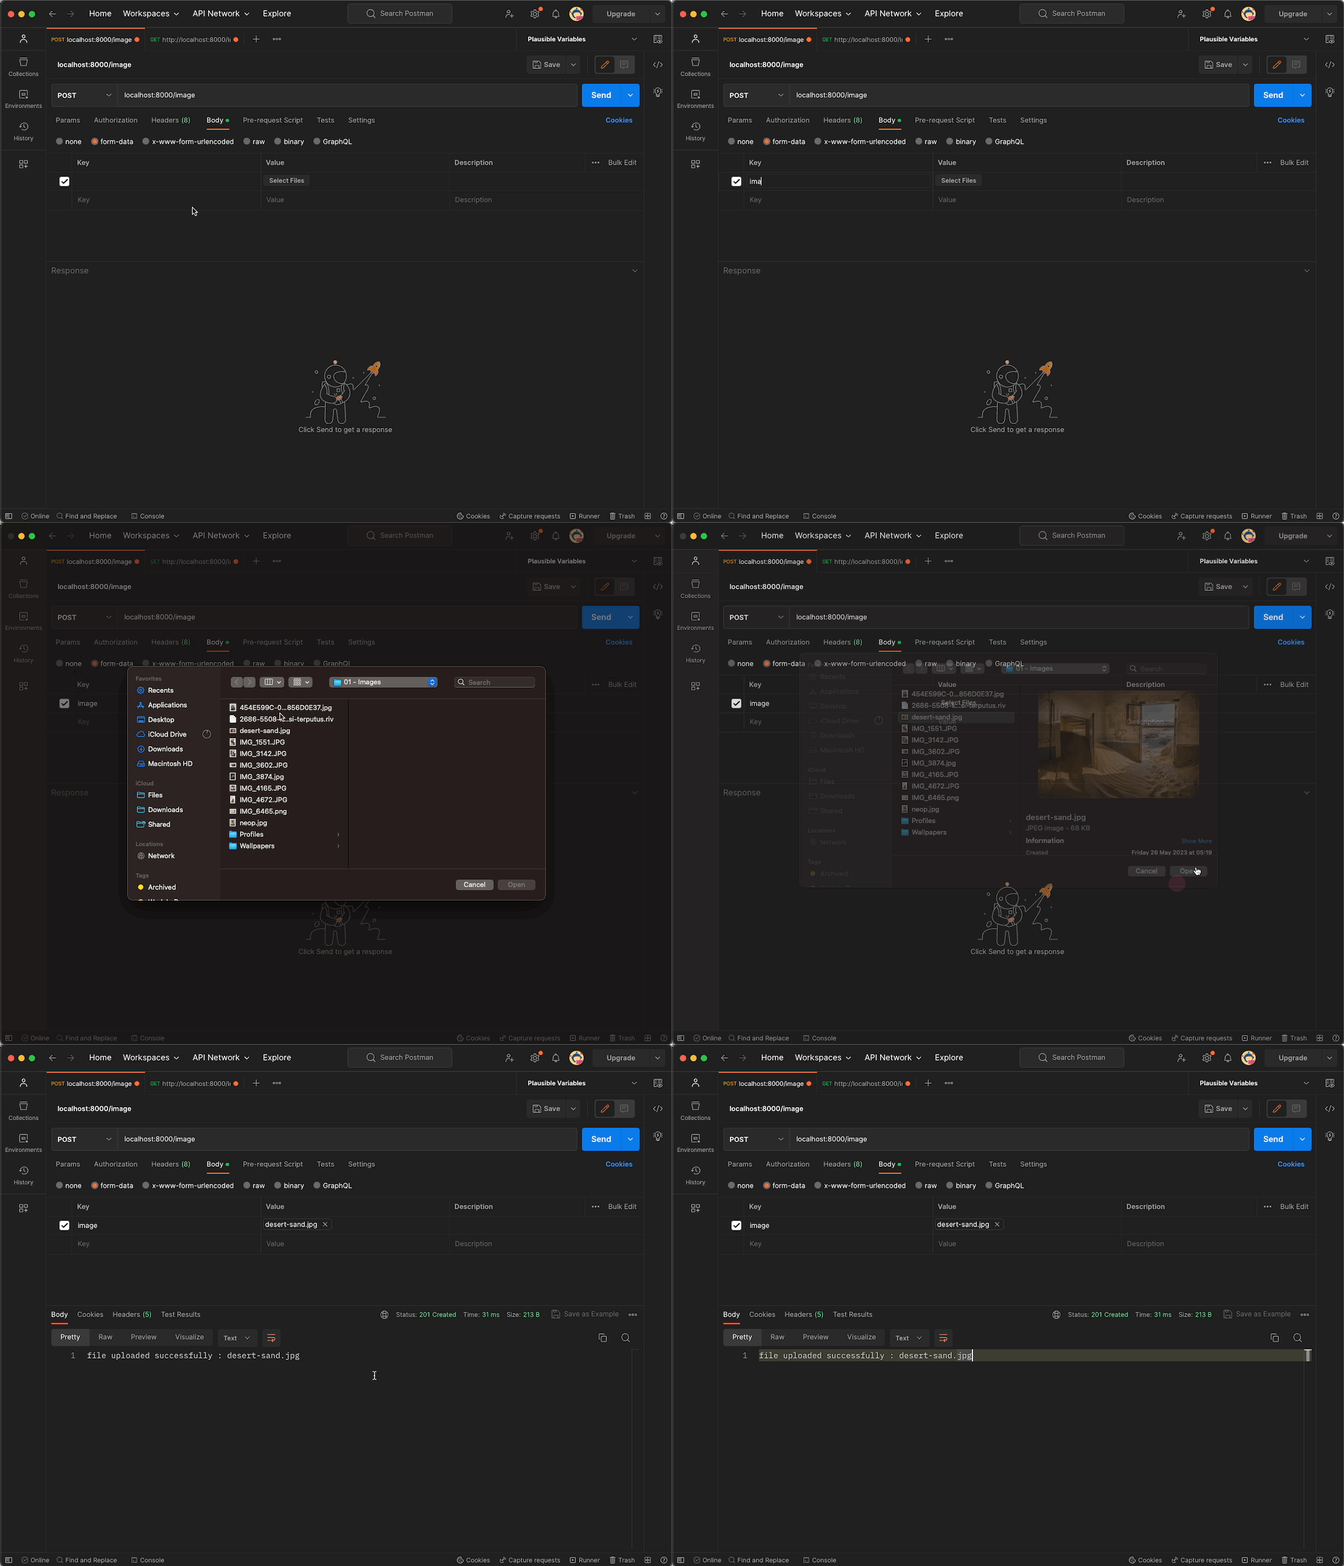
Now open your Postman desktop app and run add this URL http://localhost:8000/image to perform your POST request.

Once your database has been set up, if you pay attention, you will see a new line has been inserted.

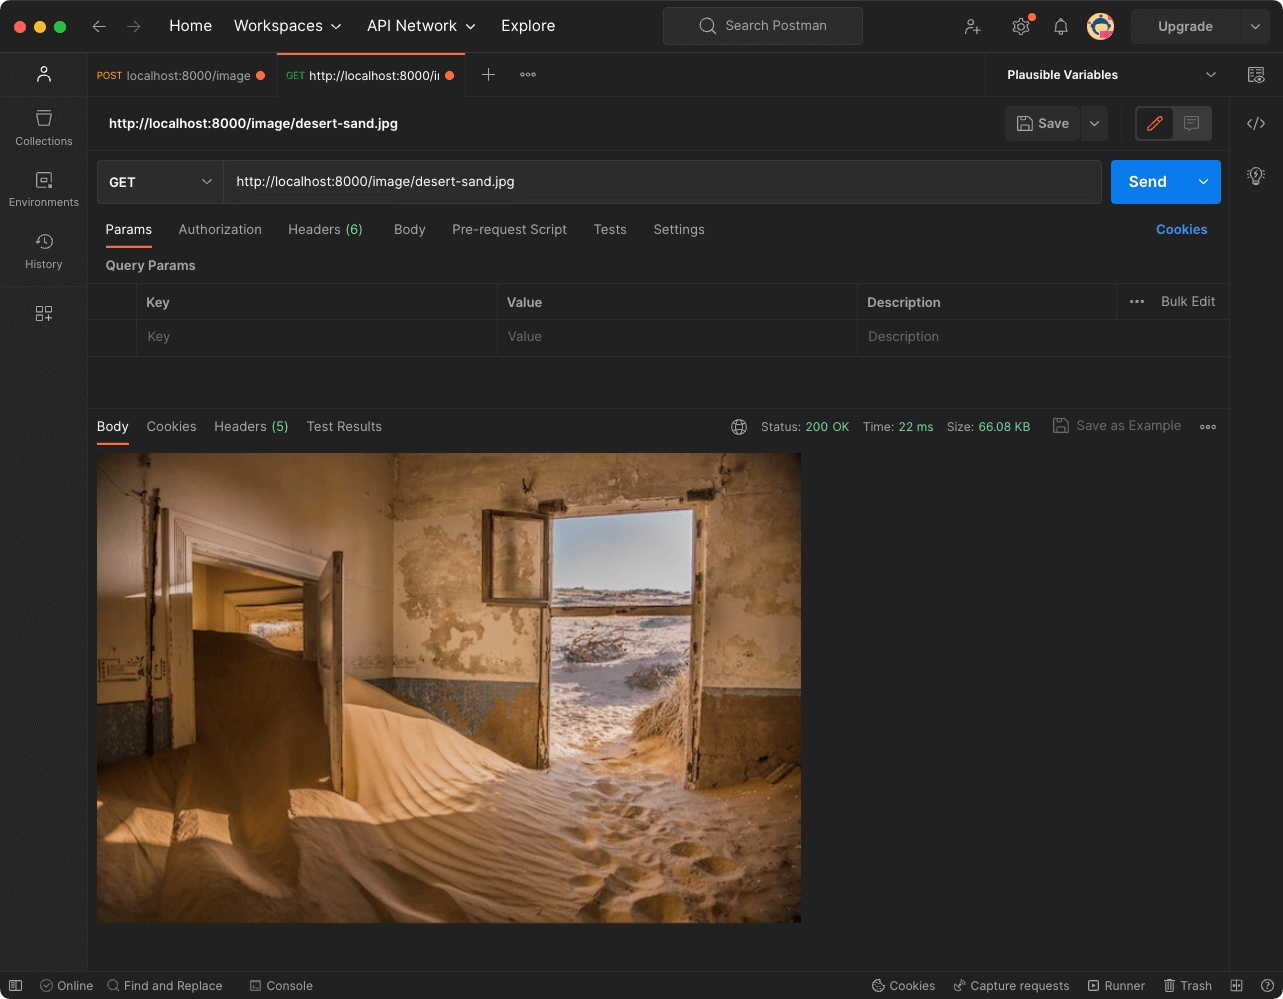
To test our second endpoint, add this URL to your Postman http://localhost:8000/image/desert-sand.jpg to test the GET Request

That’s it! Don’t forget to stop your Spring Boot application running in the background.
$ mvn spring-boot:stop
Wrap up
In this tutorial, we have covered :
- How you can set up layered architecture to upload and download an image
- How you can perform the tests of your application using Postman
- How to compress and decompress Image with Java
All source code has been packaged in this repository on my GitHub.

🔍. Similar posts
How to Delete All Content in a File Using Vim
28 Sep 2025
How to Generate a Git SSH Key on Your Mac and Add it to GitHub
31 Aug 2025
Why Are My React Components Re-rendering Too Much?
26 Jul 2025