More and more applications these days use the Client-Server Architecture. The client (front-end), needs to communicate to a server (back-end) to save or retrieve the data. This communication is established with the help of the HTTP protocol, via an API.
A REST API is an Application Programming Interface that follows the REST architecture constraints. It is basically a convention for building these HTTP Web Services.
In this article, we will see how to build a REST API using Java and Spring Boot and PostgreSQL 15.
Use case
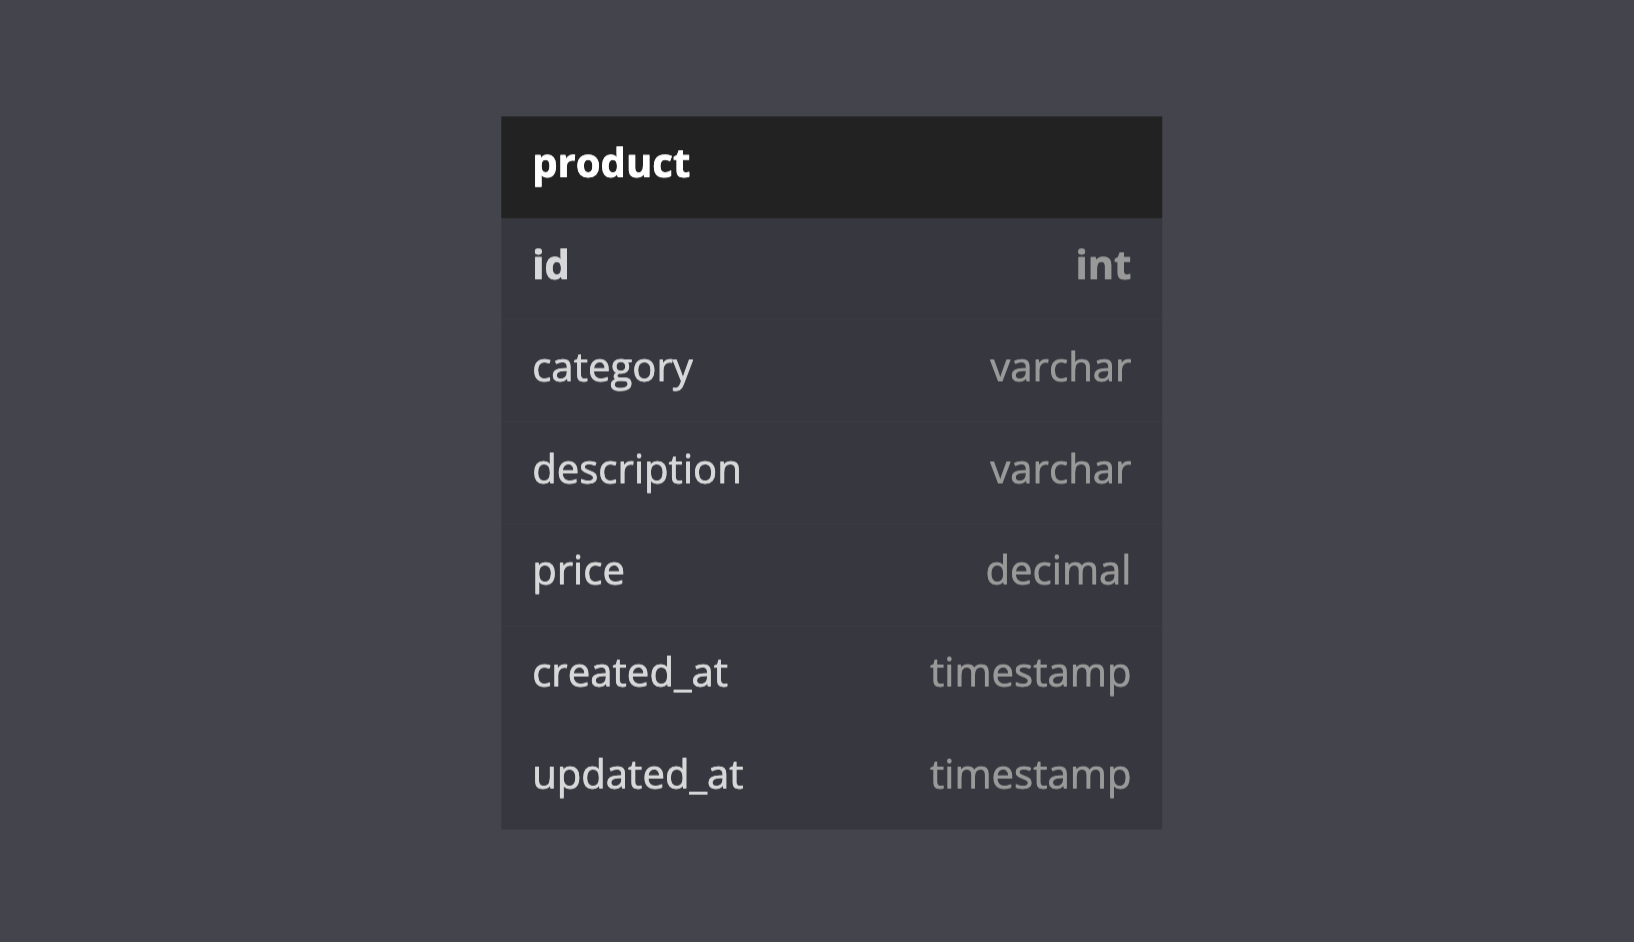
We will take a pretty simple example for this tutorial. We want to build a backend application for Product management. So, a simple database schema will look like this.

Our Rest API will expose these end points
| ENDPOINT | HTTP | ACTIONS | STATUS CODE |
|---|---|---|---|
| /products | POST | Create a new product | 201 |
| /products | GET | Retrieve all products | 200 |
| /products/:id | GET | Retrieve one product by ID | 200 |
| /products/update/:id | PUT | Update a product entirely | 200 |
| /products/update/:id | PATCH | Update a product partially | 200 |
| /products/:id | DELETE | Delete a product by ID | 204 |
| /products | DELETE | Delete all products | 204 |
Prerequisite
In order to follow this tutorial, you will need:
- Java 8+ version
- Docker
- Maven 3.5+
- An HTTP client such as curl or Postman
Create the project
To create a new spring boot project, you can download one on the spring initialzr website. Once you will have clicked on GENERATE, download the project and open it in your IDE.
You will need those dependencies.
<dependency>
	<groupId>org.postgresql</groupId>
	<artifactId>postgresql</artifactId>
	<version>42.5.1</version>
</dependency>
<dependency>
	<groupId>com.jayway.jsonpath</groupId>
	<artifactId>json-path</artifactId>
</dependency>
<dependency>
	<groupId>jakarta.validation</groupId>
	<artifactId>jakarta.validation-api</artifactId>
	<version>2.0.2</version>
</dependency>
<dependency>
    <groupId>org.projectlombok</groupId>
    <artifactId>lombok</artifactId>
    <optional>true</optional>
</dependency>
<dependency>
	<groupId>com.github.java-json-tools</groupId>
	<artifactId>json-patch</artifactId>
	<version>1.13</version>
</dependency>
We will use Lombok to avoid repetitive getters, setters, toString methods in our classes.
Define the Entity
We will use Hibernate to define the model of the entity in Java, and it will create the SQL-related queries for DDL. You can create a package named entity and create a Product class.
@Getter
@Setter
@Entity
@Builder
@AllArgsConstructor
@NoArgsConstructor
@Table(name = "product")
public class Product extends BaseEntity {

    @Id
    @Column(nullable = false)
    @GeneratedValue(strategy = GenerationType.SEQUENCE)
    private long id;

    @Enumerated(EnumType.STRING)
    @Column(name = "category", nullable = false)
    @NotNull(message = "Category must be specified.")
    private ProductCategory category;

    @Column(name = "description")
    private String description;

    @Min(0)
    @Column(name = "price", columnDefinition = "decimal (10,2)")
    private BigDecimal price;
}
Here is the BaseEntity class where we define the shared properties by all the entities in your project
@MappedSuperclass
abstract class BaseEntity implements Serializable {

    @CreationTimestamp
    @Column(updatable = false, name = "created_at")
    private LocalDateTime createdAt;

    @UpdateTimestamp
    @Column(name = "updated_at")
    private LocalDateTime updatedAt;
}
Here is the code for ProductCategory Enum.
public enum ProductCategory {
    BOOKS,
    FOODS,
    CLOTHES,
    UNKNOWN
}
Configure the database
Now let’s add the configuration of our database, so that hibernate can connect and perform database creation. In the src/main/resources/application.yml add the following code
spring:
  datasource:
    driver-class-name: org.postgresql.Driver
    url: jdbc:postgresql://postgres-db:5432/productdb
    username: postgres
    password: motdepasse
  jpa:
    hibernate:
      ddl-auto: validate
    show-sql: true

logging:
  level:
    org.springframework: info
    org.hibernate: info

server:
port: 8000Set the value of the property spring.jpa.hibernate.ddl-auto to
validate after the tables are created to prevent them from being deleted and then re-created when starting the applicationDefine the JPA Repository
The JPA repository for an entity is an interface between our application entity and the database. It will be responsible for transforming CRUD operations to SQL queries and executing them against the database.
Create a package called repository, then create a file ProductRepository and add the code below:
@Repository
public interface ProductRepository extends JpaRepository<Product, Long> {}
Define the Service
In our service layer, we define the business logic. It’s where we assure that any requirements are met before creating or updating a Product.
Create a package called service, then create a file ProductService and add the code below:
@Service
public class ProductService {

    private final ProductRepository repository;

    public ProductService(ProductRepository repository) {
        this.repository = repository;
    }

    public Product create(ProductModel product) {
        var productToSave = Product.builder()
                .description(product.getDescription())
                .category(product.getCategory())
                .price(product.getPrice())
                .build();

        return repository.save(productToSave);
    }

    public Product findById(long id) {
        return repository.findById(id).orElseThrow(EntityNotFoundException::new);
    }

    public List<Product> findAll() {
        return repository.findAll().stream().sorted(Comparator.comparing(Product::getId)).toList();
    }

    public void updateOne(long id, ProductModel product) {
        if (repository.findById(id).isEmpty()) throw new EntityNotFoundException();
        repository.updateById(product.getDescription(), product.getCategory().toString(), product.getPrice(), id);
    }

    public Product patchOne(long id, JsonPatch patch) {
        var product = repository.findById(id).orElseThrow(EntityNotFoundException::new);
        var productPatched = applyPatchToProduct(patch, product);
        return repository.save(productPatched);
    }

    public void deleteById(long id) {
        repository.deleteById(id);
    }

    public void deleteAll() {
        repository.deleteAll();
    }

    private Product applyPatchToProduct(JsonPatch patch, Product product) {
        try {
            var objectMapper = new ObjectMapper();
            JsonNode patched = patch.apply(objectMapper.convertValue(product, JsonNode.class));
            return objectMapper.treeToValue(patched, Product.class);
        } catch (JsonPatchException | JsonProcessingException e) {
            throw new RuntimeException(e);
        }
    }
}
Define the Controller
The controller is where we will expose all the endpoints to perform CRUD operation in our Rest API.
Create a package controller and a file ProductController.
@RestController
@RequestMapping("/products")
public class ProductController {

    private final ProductService service;

    public ProductController(ProductService service) {
        this.service = service;
    }
}
This code above is what our basic controller will look like.
Launch the app
If you want your end points to be available, you have to launch your application. To do so, we will use Docker to launch in containers our application and our database. I have another article about How to Dockerize a Spring Boot App.
But here is a brief reminder, let’s define our docker file.
FROM openjdk:19-alpine

RUN addgroup -S spring && adduser -S spring -G spring

USER spring:spring

ARG JAR_FILE=target/*.jar

COPY ${JAR_FILE} app.jar

ENTRYPOINT ["java","-jar","/app.jar"]
And define our docker compose, to launch our app and Postgres database in parallel.
version: '3.8'
services:
  spring-app:
    build:
      context: .
      dockerfile: spring.dockerfile
    container_name: spring-rest-api
    restart: always
    ports:
      - '8000:8000'
    depends_on:
      - postgres-db
  postgres-db:
    image: 'postgres:15-alpine'
    restart: always
    container_name: postgres-15
    environment:
      - POSTGRES_USER=postgres
      - POSTGRES_PASSWORD=motdepasse
      - POSTGRES_DB=productdb
    ports:
      - '5432:5432'
    volumes:
      - 'db:/var/lib/postgresql/data'
volumes:
  db: null
Once all the configuration are done, we can run this command to start our application
./mvnw clean package -DskipTests &&
docker compose build --no-cache &&
docker compose up -d
Create a product
To create a product, we will pass to the request a Payload, this payload must contain the following data as a request body :
- category
- description
- price
Now you should create a package named payload and add a ProductModel class.
@Getter
@Component
public class ProductModel {

    private ProductCategory category;
    private String description;
    private BigDecimal price;
}
Now update the ProductController and add the code below:
@PostMapping("/")
public ResponseEntity<Product> createProduct(@RequestBody ProductModel product) {
    return new ResponseEntity<>(service.create(product), HttpStatus.CREATED);
}
Rerun the application, open an HTTP client and try to create a Product

You can check in the database to see that the product has been recorded.

Retrieve one product
To retrieve on product, add the following in the ProductController.
@GetMapping("/{id}")
public ResponseEntity<Product> getOneProduct(@PathVariable("id") int id) {
    return new ResponseEntity<>(service.findById(id), HttpStatus.OK);
}
Retrieve all products
Then add the following in the ProductController to retrieve an ordered list of all products.
@GetMapping()
public ResponseEntity<List<Product>> getAllProducts() {
    return new ResponseEntity<>(service.findAll(), HttpStatus.OK);
}
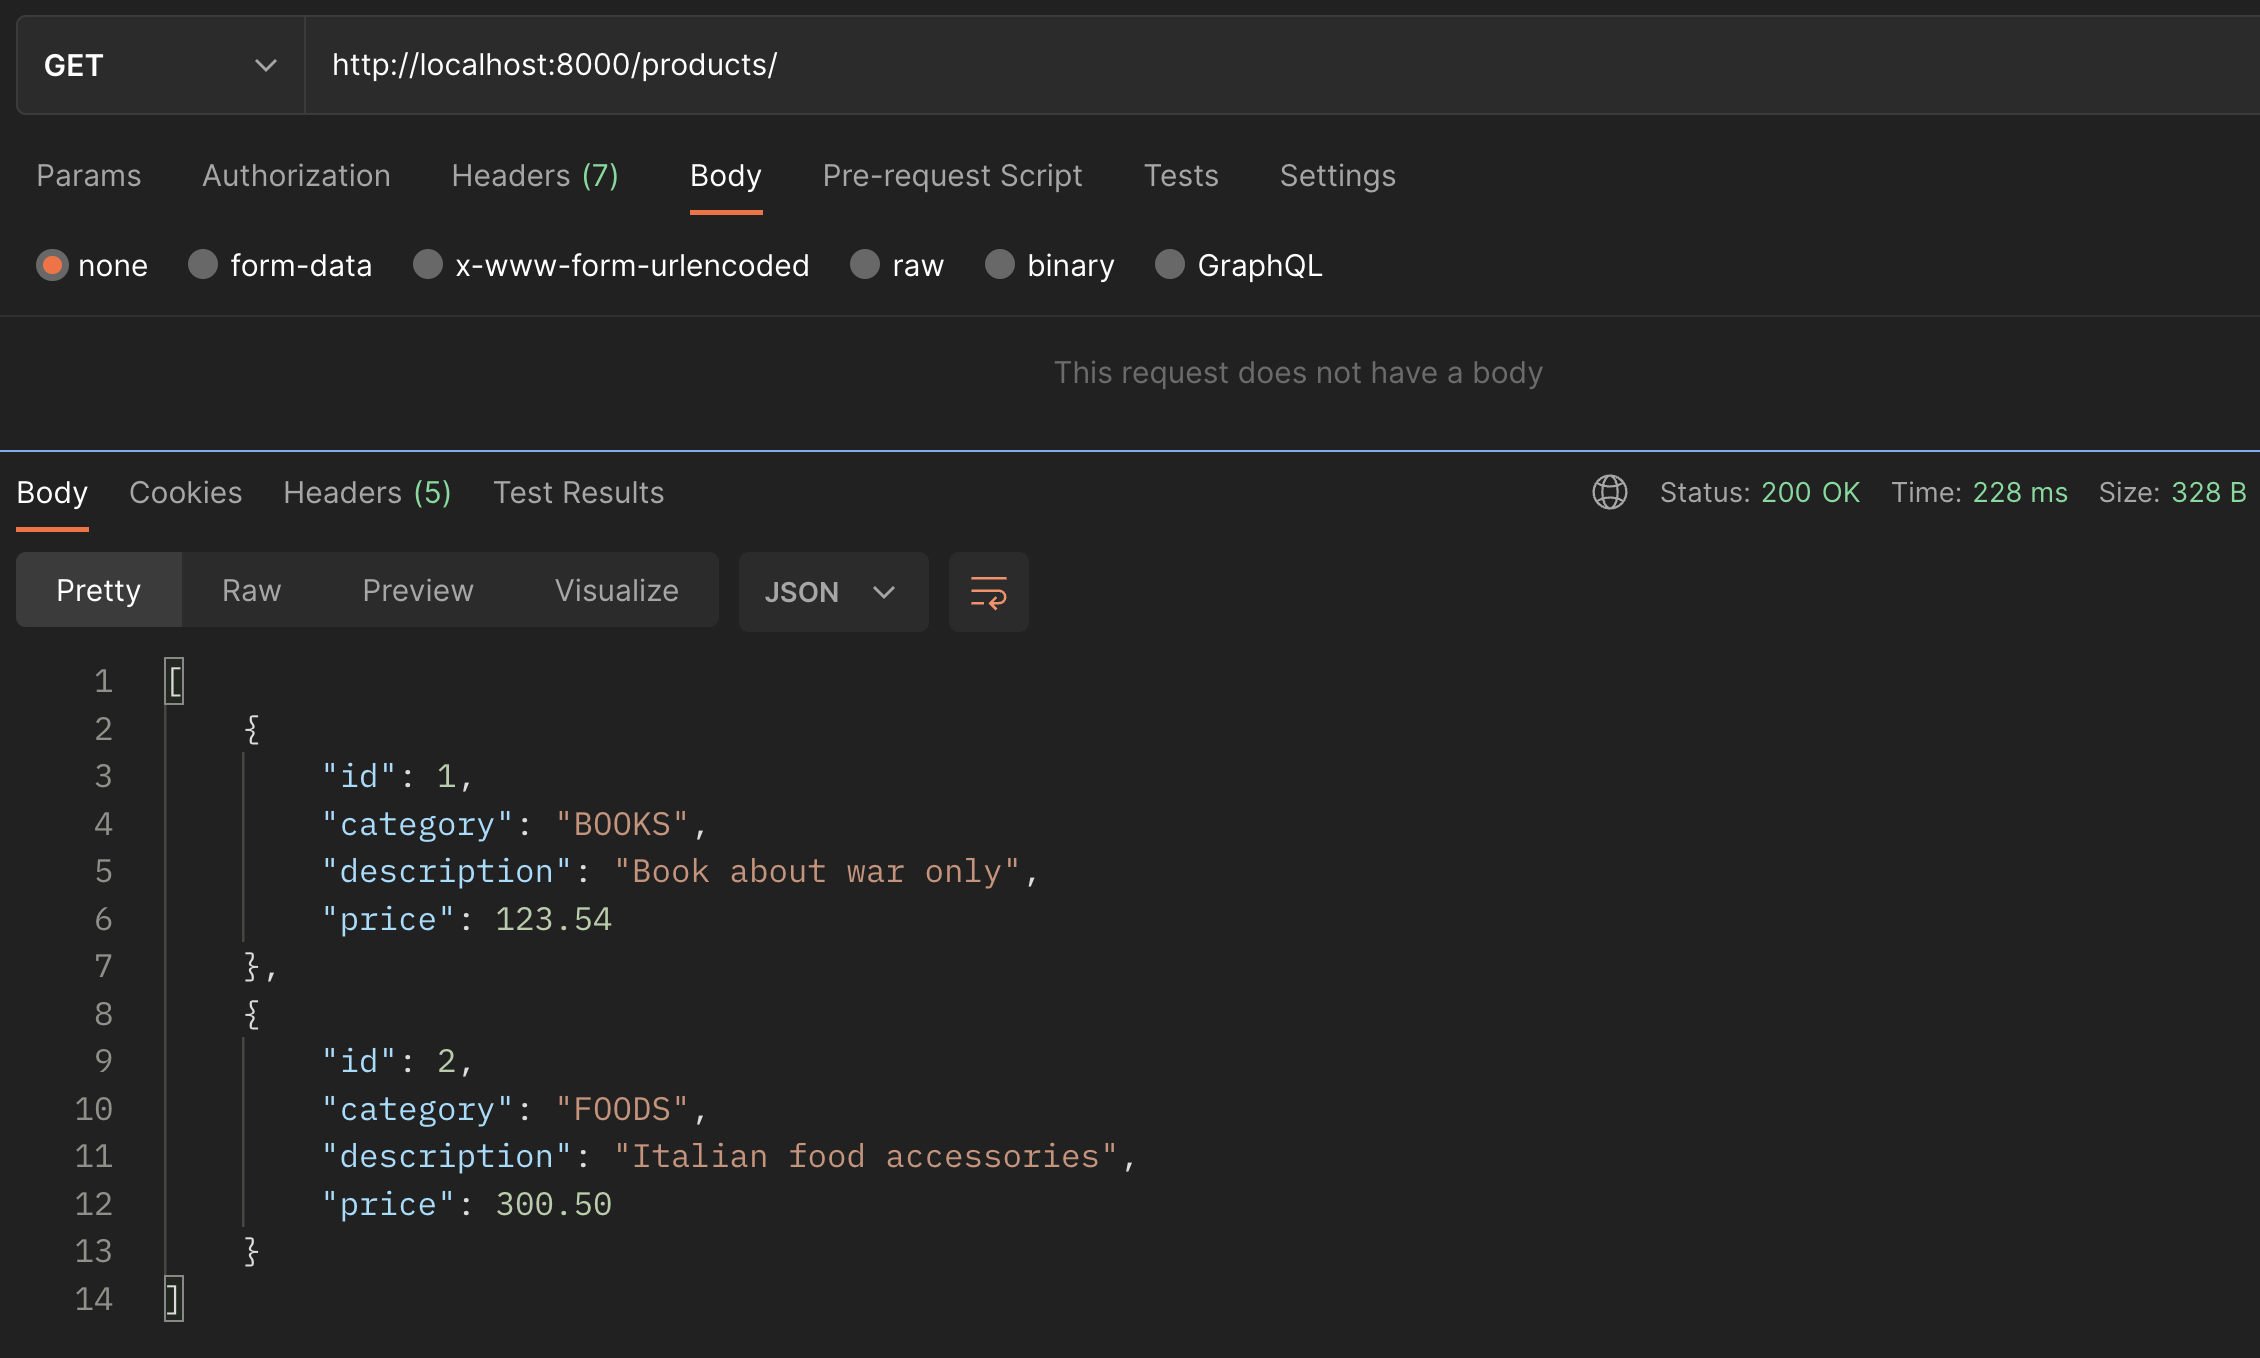
To test it, try to perform the post request once again, you will now have 2 records in the Database, and the result will be this:

In database, you will have something like this:

Update one product
Update is a little bit tricky when it comes to Rest API, we have 2 ways to update an object in our database. Full update (HTTP Put) or Partial update (HTTP Patch).
This part concerned the HTTP Put request. A common behaviour I see developers have in projects is they find the object they want to update in database, then perform some change and save the object again.
But…
To update an entity by querying, then saving is not efficient because it requires two queries and possibly the query can be expensive since it may join other tables. JPA supports native query update operation.
You have to define the method in the Repository interface and annotate it with @Query - @Modifying and @Transactional.
To use native query, you have to update your repository interface and add the following code:
@Modifying
@Transactional
@Query(value = "UPDATE product SET description = ?1, category = ?2, price = ?3 WHERE id = ?4", nativeQuery = true)
void updateById(String description, String category, BigDecimal price, long id);
Then add this code to your controller to expose the HTTP Put endpoint
@PutMapping("/update/{id}")
@ResponseStatus(HttpStatus.OK)
public void updateOneProduct(@PathVariable("id") int id, @RequestBody ProductModel product) {
    service.updateOne(id, product);
}
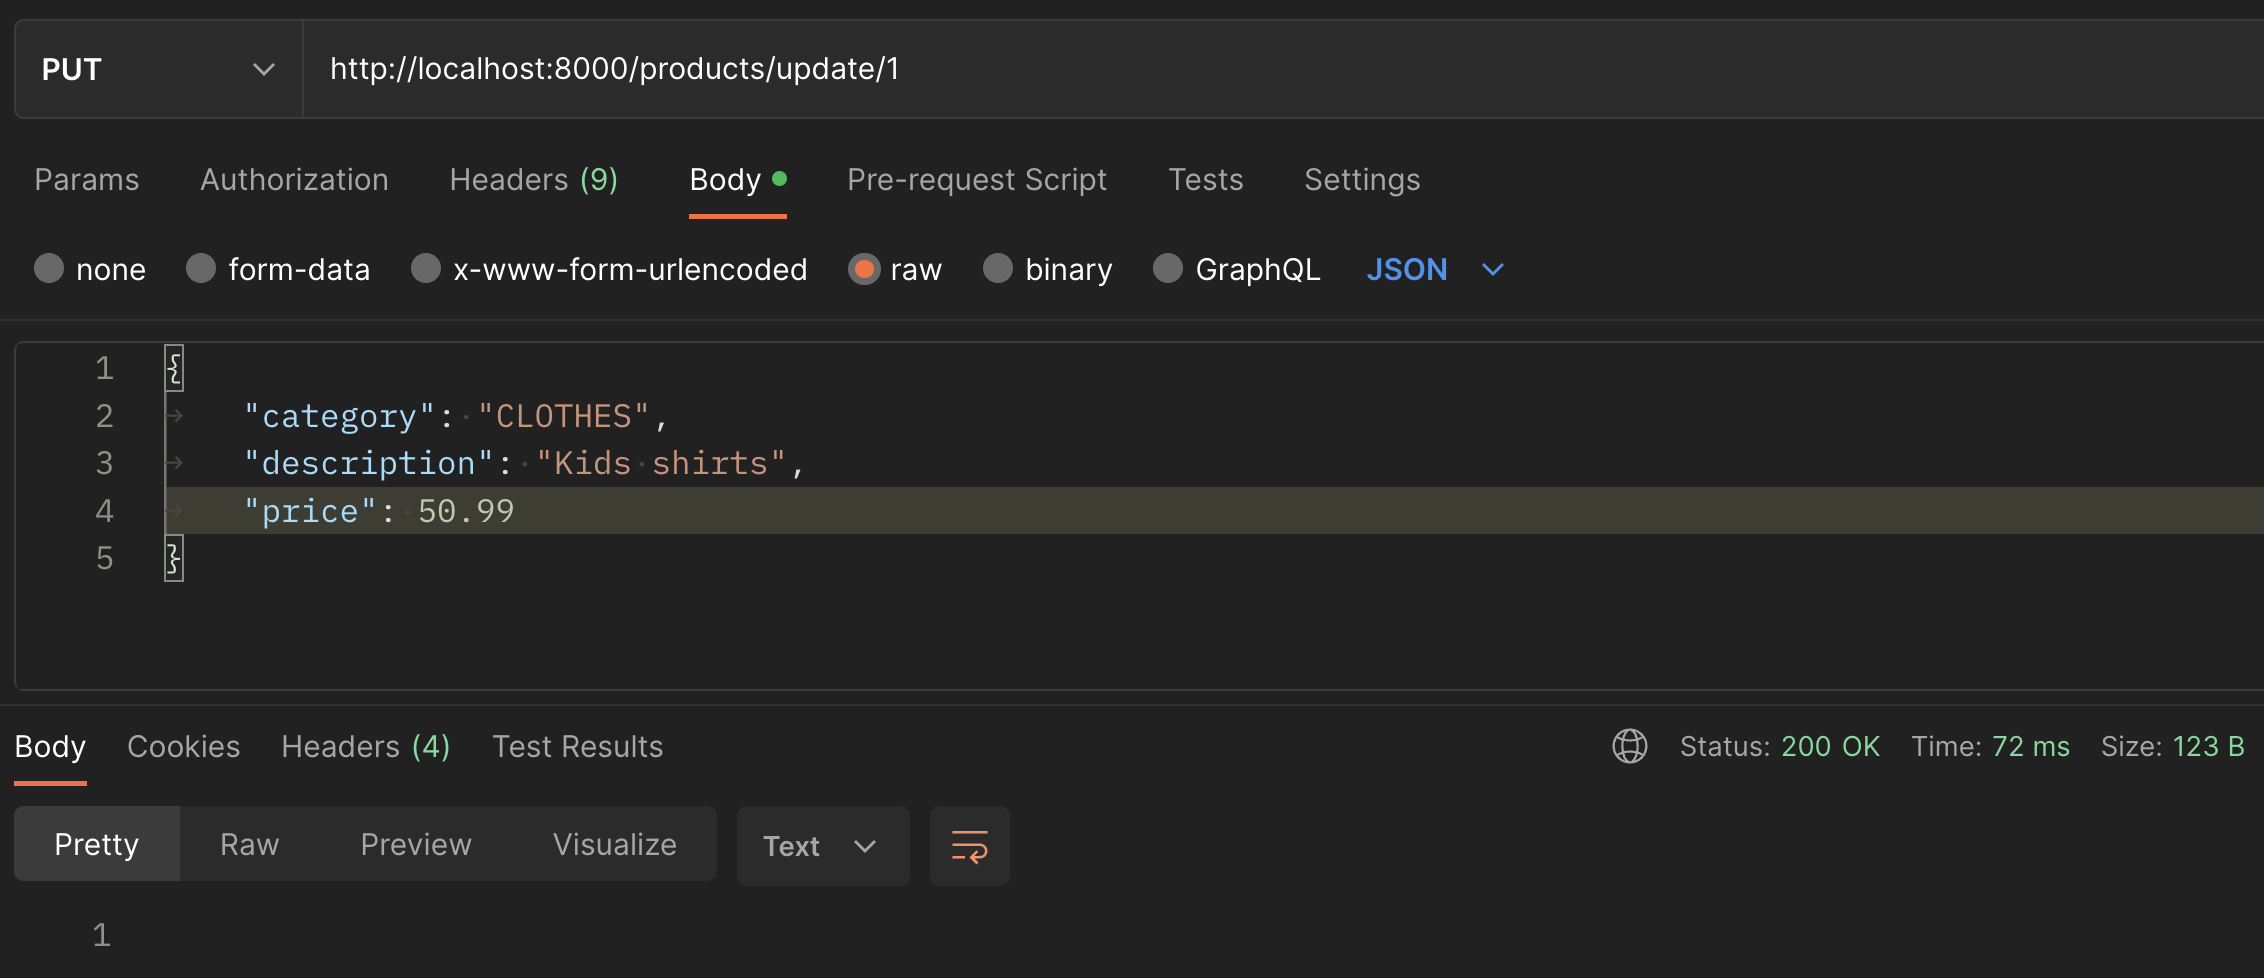
To test this end point, we will perform a Put request on product with ID = 1.

Then we can check in the database that the records have been entirely updated.

Update a product partially
To update partially an object, you can use the HTTP Patch request. Here you can find a great article on all the things you can do with. In this tutorial, we will focus on essential.
Patch is pretty simple to use when you know it works. To update a part of an object, you have to send an array of JSON as a request body to your Patch endpoint. Like the example below
[
    {
        "op": "replace", // operation
        "path": "/description", // field you want to update
        "value": "Harry Potter last book" // new value for this field
    }
]
To perform a Patch request, you have to modify your controller and add the following code
@PatchMapping(value = "/update/{id}", consumes = "application/json-patch+json")
public ResponseEntity<Product> patchOneProduct(@PathVariable("id") int id, @RequestBody JsonPatch patch) {
    return new ResponseEntity<>(service.patchOne(id, patch),HttpStatus.OK);
}
To test the request on a product with ID = 2, we will have

You see that the object has the same category (FOODS) as before, but only the description has changed. We can verify in database.

Delete a product
Erasing a Product record in database is easy, add this code to your controller.
@DeleteMapping("/{id}")
@ResponseStatus(HttpStatus.NO_CONTENT)
public void deleteOneProduct(@PathVariable("id") int id) {
    service.deleteById(id);
}
Re-run the app to test the end point.
Delete all products
Same behaviour for erasing all the Products records in the database.
@DeleteMapping()
@ResponseStatus(HttpStatus.NO_CONTENT)
public void deleteAllProducts() {
    service.deleteAll();
}
In case you want to know how the full ProductController looks like, you can check this out here.
Wrap up
Spring Boot is really a powerful tool to build real-world application. In this tutorial, you have all the things required to build a powerful Rest API. You can find all the code of this tutorial on my GitHub repository.

🔍. Similar posts
How to Delete All Content in a File Using Vim
28 Sep 2025
How to Generate a Git SSH Key on Your Mac and Add it to GitHub
31 Aug 2025
Why Are My React Components Re-rendering Too Much?
26 Jul 2025