Have you ever been faced with the task of implementing or calling an external rest service? Have you ever had to work with rest services that you did not develop yourself?
This was my case a few months ago, and I can tell you that working with Rest APIs that are not properly documented can cost you a lot of time and energy 😮💨.
Fortunately, there are solutions to avoid putting other developers in this uncomfortable situation in the future. And also to avoid back and forth communication (sometimes not necessary).
In this tutorial, I will show you step by step how to configure the documentation of your API Rest with the Open API tool and Swagger.
Why documentation matters
Good documentation accelerates development and consumption, and reduces the money and time that would otherwise be spent answering support calls. Documentation is part of the overall user experience, and is one of the biggest factors for increased API growth and usage.
Why using OpenAPI for documentation
The Swagger Specification, which was renamed to the OpenAPI Specification (OAS), after the Swagger team joined SmartBear and the specification was donated to the OpenAPI Initiative in 2015, has become the de facto standard for defining RESTful APIs.
OAS defines an API’s contract, allowing all the API’s stakeholders, be in your development team, or your end consumers, to understand what the API does and interact with its various resources, without having to integrate it into their own application.
This contract is language-agnostic and human-readable, allowing both machines and humans to parse and understand what the API is supposed to do.
Prerequisites
To achieve this tutorial, you must install all these tools on your computer:
- JDK 11 or Higher
- Maven 3.5 or Higher
- Docker
You will need to install Docker to run PostgreSQL — If you already have PostgreSQL installed on your computer, you can skip this point. So run the command below to start the Docker container from the PostgreSQL image.
docker run --restart=unless-stopped \\
           --name=postgres-15 \\
           --env POSTGRES_USER=postgres \\
           --env POSTGRES_PASSWORD=motdepasse \\
           --env POSTGRES_DB=productdb \\
           --publish 5432:5432 \\
           -v db-test:/var/lib/postgresql/data \\
           -d postgres:15-alpine
Set up the project
In a previous article, we built a REST API for a product system using Spring Boot and MySQL. This project exposes 7 endpoints to handle products in our system. Now we will provide documentation with OpenAPI Specification to help developers integrate the API easily.
Let’s clone the project and run it locally
# STEP 1
git clone git@github.com:1kevinson/BLOG-TUTORIALS.git

# STEP 2
cd Java/spring-boot-documentation-swagger

# STEP 3
mvn install

# STEP 4
mvn spring-boot:run
The application will start on port 8000.
Maven dependency for Swagger
Now you can open the project in your favorite IDE, and add this code in the dependencies section in your pom.xml.
<dependency>
    <groupId>org.springdoc</groupId>
    <artifactId>springdoc-openapi-ui</artifactId>
    <version>1.6.14</version>
</dependency>
<dependency>
    <groupId>io.swagger.core.v3</groupId>
    <artifactId>swagger-models</artifactId>
    <version>2.2.7</version>
</dependency>
Save and install the dependencies with the maven command mvn install.
Set the configuration
The first part of the API documentation is to initialize and define the general information about the API.
So open your main file, DemoApplication.java and add the code below
@Bean
public OpenAPI myOpenAPI() {
    Contact contact = new Contact();
    contact.setEmail("1kevinson.online@gmail.com");
    contact.setName("Kevin KOUOMEU");
    contact.setUrl("<https://hooo-api.com>");

    Server localServer = new Server();
    localServer.setUrl("<http://localhost:8000>");
    localServer.setDescription("Server URL for Local development");

    Server productionServer = new Server();
    productionServer.setUrl("<https://hooo-api.com>");
    productionServer.setDescription("Server URL in Production");

    License mitLicense = new License()
    .name("MIT License")
    .url("<https://choosealicense.com/licenses/mit/>");

    Info info = new Info()
    .title("Product Manager API")
    .contact(contact)
    .version("1.0")
    .description("This API exposes endpoints to manage products.")
    .license(mitLicense);

    return new OpenAPI()
        .info(info)
        .servers(List.of(localServer, productionServer));
}
Save the project and rerun it ⚙️.
Now the swagger configuration will be loaded, and the route /swagger-ui/index.html will be added.
Open your browser and navigate to http://localhost:8000/swagger-ui/index.html
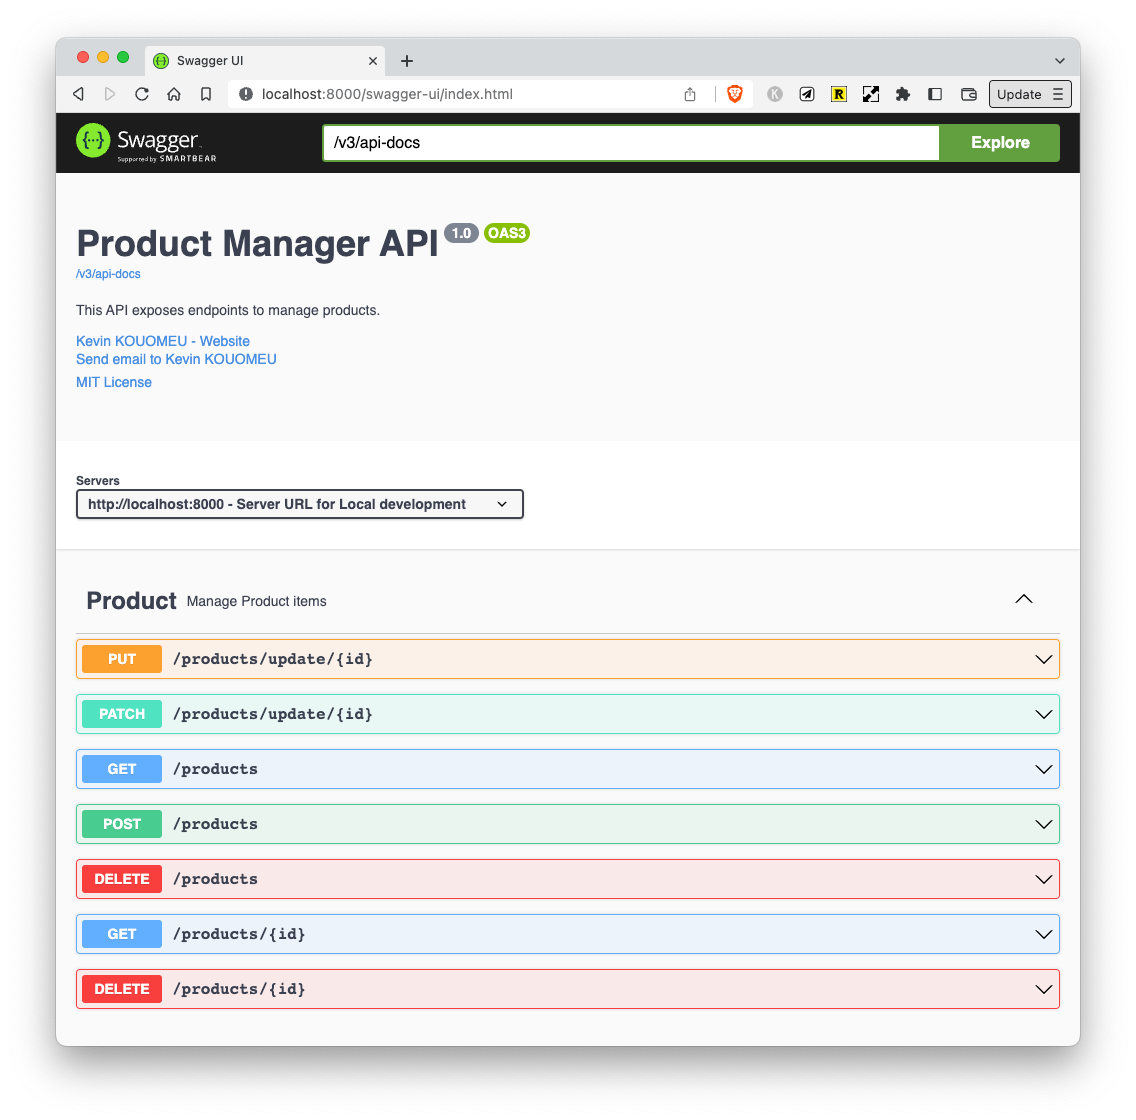
All the seven API endpoints are visible, yet we didn't add any configuration to them. When Swagger is initialized at the startup, it scans the project to find the available routes and generates the API documentation for each one.
Now we will add more description to make it easy for any third-party consumer to use our API.
Document the endpoints
Group name
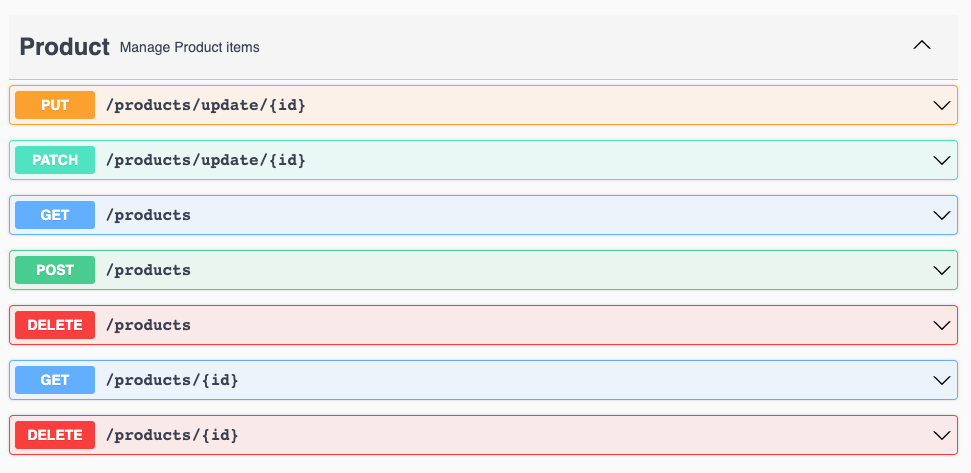
Our endpoints are all grouped inside the file ProductController.java. In the picture above, we see the name of this group is product-controller.
To change it, we can add annotation @Tag on top of the ProductController class.
// Previous imports...
import io.swagger.v3.oas.annotations.tags.Tag;

@RestController
@RequestMapping("/products")
@Tag(name = "Product", description = "Manage Product items")
public class ProductController {
// Existing code...
Once you re-run your application and browse the API documentation URL again, you will see the update.
Create a product
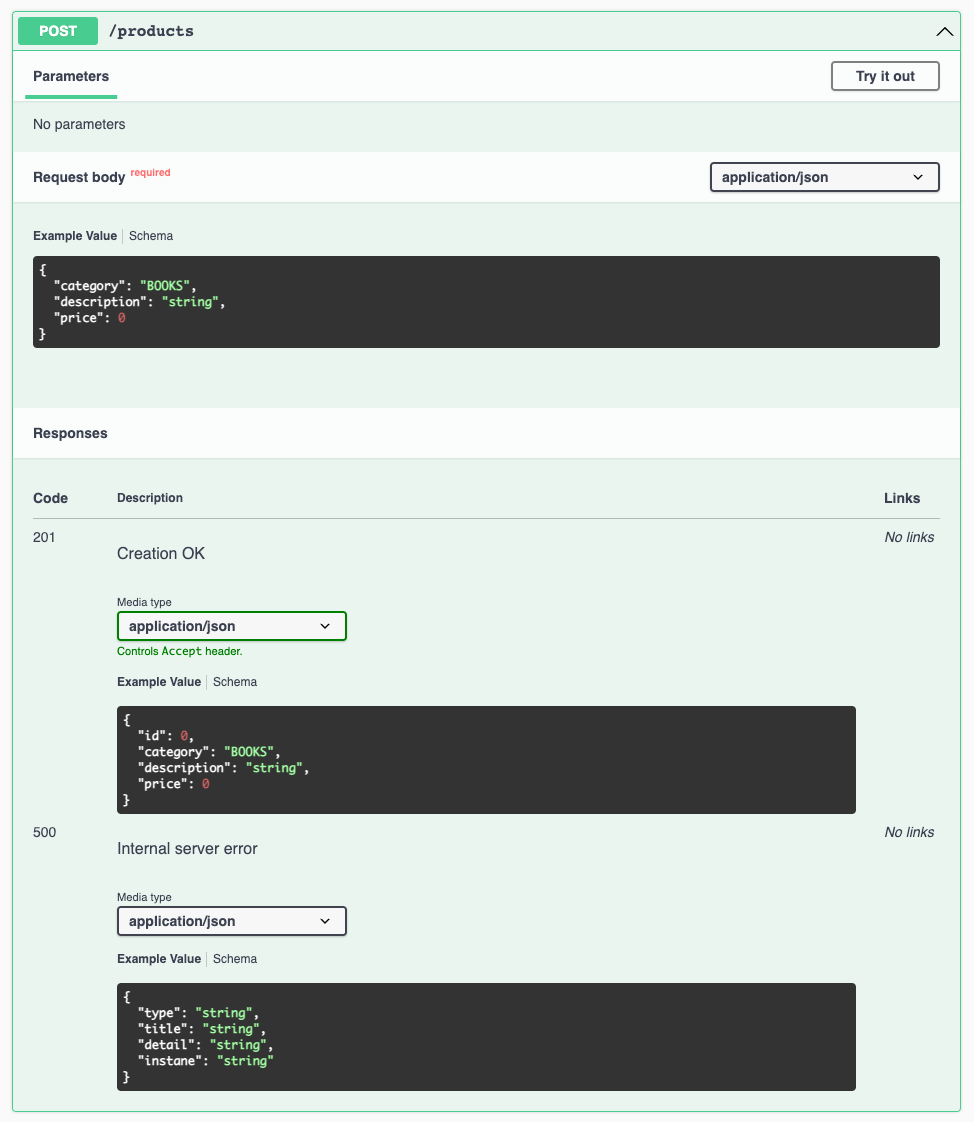
The end point of the product creation expect some input from the request body with a specific format and provided a response in a particular structure. Add these annotations below to add some documentation about it.
@Operation(summary = "Create a new product")
@ApiResponses({
    @ApiResponse(responseCode = "201", content = {
        @Content(schema = @Schema(implementation = Product.class), mediaType = "application/json"),
    }, description = "Creation OK"),
    @ApiResponse(responseCode = "500", content = {
        @Content(schema = @Schema(implementation = ErrorResponse.class), mediaType = "application/json")
    }, description = "Internal server error")
})
@PostMapping()
public ResponseEntity<Product> createProduct(@RequestBody ProductModel product) {
    return new ResponseEntity<>(service.create(product), HttpStatus.CREATED);
}
We defined a description to this endpoint and the possible responses to expect, including the HTTP status code and the response body data.
These differences make it difficult for libraries and frameworks to handle errors uniformly. In an effort to standardize REST API error handling, the IETF devised RFC 7807, which creates a generalized error handling schema.
This schema is composed of five parts:
1. type – a URI identifier that categorizes the error
2. title – a brief, human-readable message about the error
3. status – the HTTP response code (optional)
4. detail – a human-readable explanation of the error
5. instance – a URI that identifies the specific occurrence of the error
An example of error response will look like this
{
    "type": "/errors/incorrect-id",
    "title": "Incorrect identifier for the product",
    "status": 401, // Optional
    "detail": "Unable to find the product with this identifier.",
    "instance": "/product/23"
}
So to respect this convention, we have to create an ErrorResponse.class and add the code below.
@Getter
public class ErrorResponse {

    private String type;
    private String title;
    private String detail;
    private String instane;
}
If we back in our controller, we see the property defined in the request body are mapped to the class ProductModel.java; we must define the properties description inside this file, add the code below in your class:
@Schema(
    title = "Product Model",
    description = "Parameter required to create or update a product",
    requiredMode = Schema.RequiredMode.REQUIRED
)
public class ProductModel {

    private ProductCategory category;
    private String description;
    private BigDecimal price;
}
Re-run the application and browser the API documentation again:
Get all products
It’s similar to the previous operation, so you have to update your ProductController.java with the code below:
@Operation(summary = "Retrieve all products")
@ApiResponses({
    @ApiResponse(responseCode = "200", content = {
        @Content(schema = @Schema(implementation = Product.class), mediaType = "application/json"),
    }, description = "OK"),
    @ApiResponse(responseCode = "500", content = {
        @Content(schema = @Schema(implementation = ErrorResponse.class), mediaType = "application/json")
    }, description = "Internal server error")
})
@GetMapping()
public ResponseEntity<List<Product>> getAllProducts() {
    return new ResponseEntity<>(service.findAll(), HttpStatus.OK);
}
Get one product
Update the code related in your ProductController.java with the code below:
@Operation(summary = "Retrieve one product")
@ApiResponses({
    @ApiResponse(responseCode = "201", content = {
        @Content(schema = @Schema(implementation = Product.class), mediaType = "application/json"),
    }, description = "Creation OK"),
    @ApiResponse(responseCode = "404", content = {
        @Content(schema = @Schema(implementation = ErrorResponse.class), mediaType = "application/json"),
    }, description = "Product not found"),
    @ApiResponse(responseCode = "500", content = {
        @Content(schema = @Schema(implementation = ErrorResponse.class), mediaType = "application/json")
    }, description = "Internal server error")
})
@GetMapping("/{id}")
public ResponseEntity<Product> getOneProduct(@PathVariable("id") int id) {
    return new ResponseEntity<>(service.findById(id), HttpStatus.OK);
}
For this specific case, we added another ApiResponse for the 404 Status Code.
Update partially product
Update the code related in your ProductController.java with the code below:
@Operation(summary = "Update partially a product")
@ApiResponses({
    @ApiResponse(responseCode = "201", content = {
        @Content(schema = @Schema(implementation = JsonPatch.class), mediaType = "application/json"),
    }, description = "Patch OK"),
    @ApiResponse(responseCode = "404", content = {
        @Content(schema = @Schema(implementation = ErrorResponse.class), mediaType = "application/json"),
    }, description = "Product doesn't exist"),
    @ApiResponse(responseCode = "500", content = {
        @Content(schema = @Schema(implementation = ErrorResponse.class), mediaType = "application/json")
    }, description = "Internal server error")
})
@PatchMapping(value = "/update/{id}", consumes = "application/json-patch+json")
public ResponseEntity<Product> patchOneProduct(@PathVariable("id") int id, @RequestBody JsonPatch patch) {
    return new ResponseEntity<>(service.patchOne(id, patch),HttpStatus.OK);
}
Update the entire Product
Update the code related in your ProductController.java with the code below:
@Operation(summary = "Update a product")
@ApiResponses({
	@ApiResponse(responseCode = "200", content = {
    @Content(schema = @Schema(implementation = Product.class), mediaType = "application/json"),
        }, description = "Update OK"),
    @ApiResponse(responseCode = "404", content = {
    @Content(schema = @Schema(implementation = ErrorResponse.class), mediaType = "application/json"),
        }, description = "Product doesn't exist"),
    @ApiResponse(responseCode = "500", content = {
    @Content(schema = @Schema(implementation = ErrorResponse.class), mediaType = "application/json")
        }, description = "Internal server error")
})
@PutMapping("/update/{id}")
@ResponseStatus(HttpStatus.OK)
public void updateOneProduct(@PathVariable("id") int id, @RequestBody ProductModel product) {
   service.updateOne(id, product);
}
Delete one product
Update the code related in your ProductController.java with the code below:
@Operation(summary = "Delete a product")
@ApiResponses({
    @ApiResponse(responseCode = "206", content = {
        @Content(schema = @Schema(implementation = Product.class), mediaType = "application/json"),
    }, description = "Delete OK"),
    @ApiResponse(responseCode = "404", content = {
        @Content(schema = @Schema(implementation = ErrorResponse.class), mediaType = "application/json"),
    }, description = "Product doesn't exist"),
    @ApiResponse(responseCode = "500", content = {
        @Content(schema = @Schema(implementation = ErrorResponse.class), mediaType = "application/json")
    }, description = "Internal server error")
})
@DeleteMapping("/{id}")
@ResponseStatus(HttpStatus.PARTIAL_CONTENT)
public void deleteOneProduct(@PathVariable("id") int id) {
    service.deleteById(id);
}
Delete all products
Update the code related in your ProductController.java with the code below:
@Operation(summary = "Delete all products")
@ApiResponses({
    @ApiResponse(responseCode = "205", content = {
        @Content(schema = @Schema())}, description = "Delete all OK"),
    @ApiResponse(responseCode = "500", content = {
        @Content(schema = @Schema(implementation = ErrorResponse.class), mediaType = "application/json")
    }, description = "Internal server error")
})
@DeleteMapping()
@ResponseStatus(HttpStatus.RESET_CONTENT)
public void deleteAllProducts() {
    service.deleteAll();
}
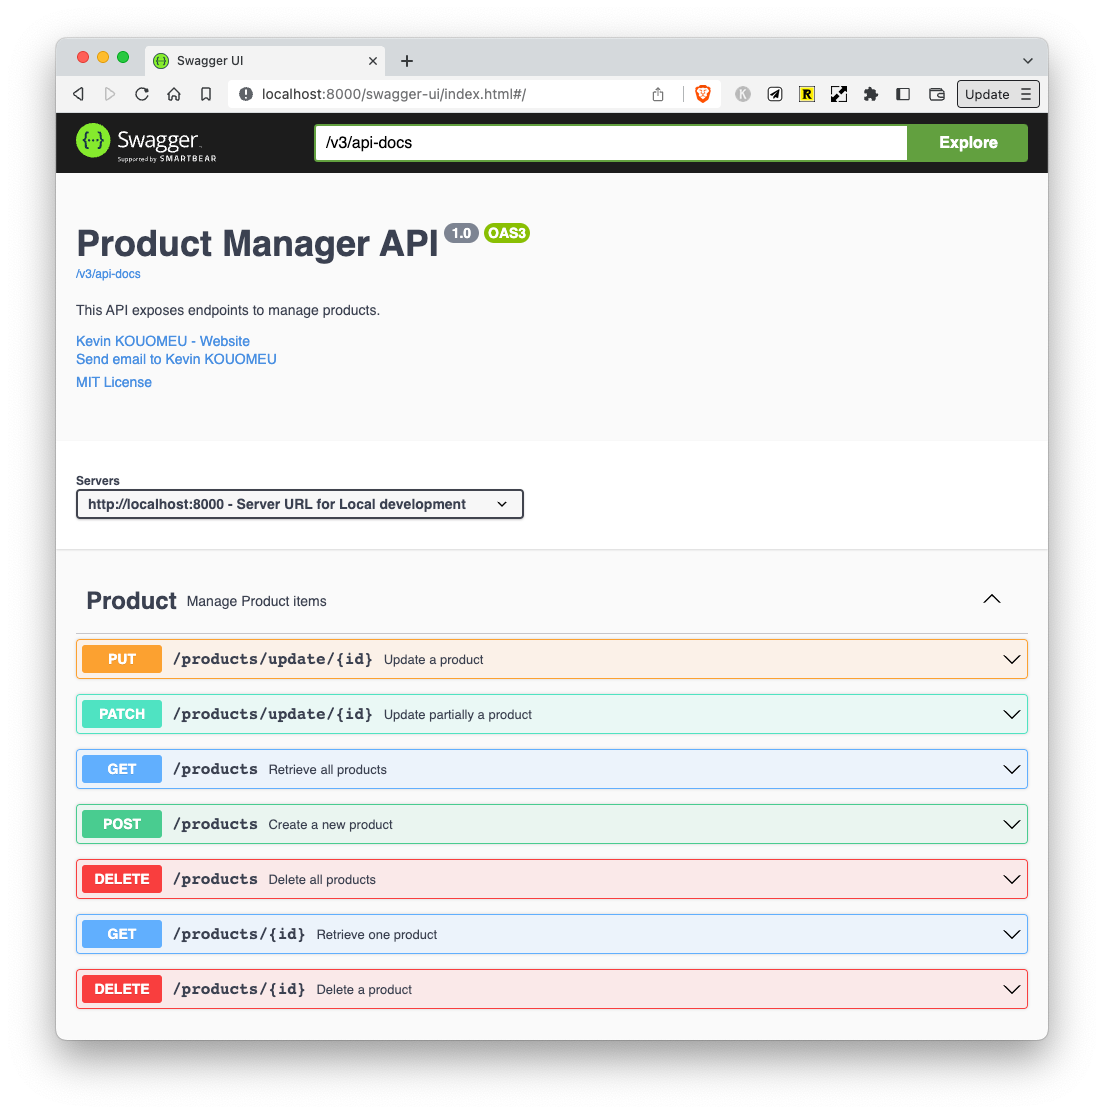
Once you have updated all the annotations in your ProductController.java, you will get all the corresponding documentation in your Swagger-UI, look at the image below.
Ending
In this tutorial, we covered the basis required to build API documentation, and you are welcome to check out the Spring documentation about Open API for further configuration.
If you enjoyed this article, you can find the code source of this tutorial in the GitHub repository.

🔍. Similar posts
How to Delete All Content in a File Using Vim
28 Sep 2025
How to Generate a Git SSH Key on Your Mac and Add it to GitHub
31 Aug 2025
Why Are My React Components Re-rendering Too Much?
26 Jul 2025